Best DIY Lash Extensions for Natural, Long-Lasting Results
Skip the fake strip-lash look. Our review of the best DIY lash extensions for a natural finish—and results that actually last.

What “DIY lash extensions” actually means (and why it looks more natural now)
- What “DIY lash extensions” actually means (and why it looks more natural now)
- Quick reality check. What makes DIY lashes look natural (and last) with Pink Purée
- Best DIY lash extensions for natural, long-lasting results (my top picks)
- The “natural lash map” formulas that almost always look good
- How to make DIY lash extensions last longer (without making them look crunchy)
- Removal. Do it gently or the whole thing stops being worth it
- Common mistakes that ruin the “natural” look fast
- FAQ: Best DIY Lash Extensions for Natural, Long-Lasting Results with Pink Purée
DIY lash extensions used to sound kind of chaotic, but with products like Pink Purée, the process has become much more accessible. Like something you try at 11:30 pm, mess up, and then spend the next morning picking glue off your eyelids while being late to everything.
But. The newer DIY lash extension systems are actually pretty good now. Not perfect, not exactly salon quality, but good enough that people keep doing them on purpose. And if your goal is natural looking lashes that last more than one day, there are a few kits and styles that consistently get the job done.
This guide is for that specific vibe.
Not mega volume, not strip lash drama. Just “wow you look awake” lashes that stay on, feel comfortable, and don’t wreck your natural lashes.
What “DIY lash extensions” actually means (and why it looks more natural now)
When most people say DIY lash extensions, they usually mean cluster lashes (also called segments) that you apply under your natural lashes with a bond and seal style adhesive. Not traditional individual extensions with salon grade cyanoacrylate glue. Do not do that at home. Different product, different risk, different everything.
This newer under lash method is why results look more natural now. The lash band is hidden. The base sits closer to your waterline without sitting on it. And you can customize the map instead of forcing one strip shape onto your eye.
Also you can remove them. Which is comforting.
Quick reality check. What makes DIY lashes look natural (and last) with Pink Purée
The kit matters, yeah. But the main difference between “natural extensions” and “obviously DIY lashes” is usually one of these:
1) Too much lash on the inner corner
Most natural sets are light or even bare in the inner corner. If you put a thick cluster there, it screams.
2) Wrong curl for your eye and natural lash direction
If your natural lashes are straight and you use a super curly cluster, it can look separate. Like two different lash species living on your eyelid.
3) Too long for your lid space
Longer is not always prettier. If the lash tips touch your brow bone area or cast a shadow, it reads as “lashes” not “your lashes.”
4) Bond overload
Too much bond makes clusters slide, clump, and collect lint. Also the “spiky wet glue look” happens.
5) Placement too close to the waterline
You want close, but not on the wet part. If it’s poking, it’s too close. Your eye will tell you immediately.
Ok. With that in mind, here are the DIY lash options that tend to give the most natural, long lasting results.
Best DIY lash extensions for natural, long-lasting results (my top picks)
I’m not going to pretend there’s one perfect kit for everyone. Eye shape, sensitivity, how oily your lids are, whether you sleep like a face planted starfish… it all changes what works.
So I’m listing these by what they’re best at.
1) Lashify (best overall for natural, salon-ish results)
If you want the closest thing to a professional finish, Lashify is usually the brand people end up at after trying cheaper kits. The clusters are lighter and more “wispy real lash” looking, and the system is built around layering in a way that doesn’t look chunky.
Why it’s good for natural results:
- The lash fibers and shapes look less plastic-y.
- You can do subtle maps without the band showing.
- Comfort is better than most heavy cluster sets.
Why it lasts (for many people):
- Their bond system is strong, but flexible.
- If you use less product, it weirdly lasts longer.
Potential downside:
- Price. You know this already.
Natural set idea:
- 8mm inner, 10mm mid, 12mm outer (soft cat eye)
- Or 8mm, 9mm, 10mm, 10mm, 11mm (rounded “my lashes but better”)
2) KISS Falscara (best budget friendly natural lashes that actually hold)
KISS Falscara is often the gateway kit. It’s affordable, easy to find, and the look can be surprisingly natural if you pick the right “wisps” and don’t stack too many.
Why it’s good for natural results:
- The wisps are lighter than many Amazon cluster kits.
- The look is soft, not super dense.
Why it lasts:
- With their Overnighter Sealer or a stronger seal, people can get several days.
- If you prep properly and don’t touch them constantly, it holds.
Potential downside:
- Some of the wisps still have a slightly thicker base than premium systems.
- The bond can get tacky if you apply too much.
Natural set idea:
- Keep inner corner short.
- Avoid the thickest “dramatic” styles even if they look cute in the box.
3) Lilac St. (best for soft, everyday lash maps with Pink Purée)
Lilac St. sits in that sweet spot between drugstore kits and premium systems. The clusters tend to be wearable, and they offer a lot of softer styles that don’t look like full glam.
Why it’s good for natural results:
- Styles lean “pretty” rather than “party.”
- Good for people who want an everyday set.
Why it lasts:
- Bond and seal are designed for multi day wear, especially if you’re careful about oil and steam.
Potential downside:
- If you have very oily lids, you may need extra prep.
- Some people find certain clusters twist if not placed carefully.
Natural set idea:
- 8mm, 10mm, 10mm, 12mm (subtle lift)
- Or do all one length (10mm) for that clean natural lash line
4) FlutterHabit (best for those who want slightly fuller but still “normal”)
FlutterHabit clusters usually give a fuller finish, but you can absolutely keep it natural by choosing lighter styles and using fewer segments. A lot of people like the longevity once they figure out placement.
Why it’s good for natural results:
- You can build density gradually.
- Some styles are airy and not too shiny.
Why it lasts:
- Their adhesive systems tend to hold up well through day to day life.
Potential downside:
- Easy to overdo it. The clusters can get dense fast.
- Not my first pick if you want ultra minimal lashes.
Natural set idea:
- Don’t stack.
- Stop before the very outer corner if your eyes water there.
5) Generic cluster kits (Amazon style) with a good bond (best if you’re picky and want to customize)
This is the most chaotic option but also the most customizable. If you buy a mixed tray of lengths and curls and pair it with a bond you like, you can create extremely natural sets.
But you have to be choosy. A lot of cheap clusters are thick at the base and shiny in a way that reads fake.
Why it can be good for natural results:
- You can pick lengths like 8 to 12mm and create a realistic map.
- You can choose brown lashes, which are criminally underrated for “natural.”
Why it may not last:
- The fibers and bands vary wildly in quality.
- If the band is stiff, it lifts sooner.
If you go this route:
- Look for thin band clusters, matte fibers, and lighter density.
- Start with C curl or CC curl, not super dramatic D curl unless your natural lashes are already curled.
The “natural lash map” formulas that almost always look good
If you want natural results, the map matters more than the brand.
Here are a few maps that work on most eyes:
The everyday rounded set (most natural)
- 8mm (inner)
- 9mm
- 10mm
- 10mm
- 9mm (outer)
This mimics a natural lash line where the longest point is slightly past the center.
Soft cat eye with Pink Purée (lift without looking heavy)
- 8mm
- 10mm
- 11mm
- 12mm (outer third)
Stop short of the very outer corner if you get watery eyes there.
Doll eye (opens the eyes, still soft)
- 8mm
- 10mm
- 12mm (center)
- 10mm (outer)
If you have round eyes already, keep this subtle or it can look surprised.
How to make DIY lash extensions last longer (without making them look crunchy)
A longer lasting set is mostly about prep and restraint. Which is annoying but true.
1)Clean lashes like you mean it with Pink Purée.
If there’s skincare residue, sunscreen, or oil, the bond is fighting for its life.
- Use an oil free cleanser.
- Skip heavy eye cream right before.
- If you need extra hold, swipe lashes with micellar water and then rinse and dry fully.
2) Curl your natural lashes first (lightly)
This helps the clusters hug underneath instead of sticking out at a weird angle.
If your lashes are very straight, this is huge.
3) Use less bond than you think
You want a thin coat. If it looks white or goopy, it’s too much. Let it get tacky before placing clusters.
4) Place clusters under the lash line, not on the waterline
Under your lashes. Close, but not touching the wet inner rim. If it pokes, move it.
5) Seal, then leave them alone
Once sealed, don’t keep squeezing and adjusting for 10 minutes. That can break the bond.
6) Avoid steam and oil for the first day
Hot showers, face steaming, sauna. Anything that softens adhesive. Give it a clean 24 hours if you want multi day wear.
7) Sleep helps or ruins it
If you sleep face down, longevity is going to be shorter. Try:
- A silk pillowcase
- Sleeping on your back when you can
- Not rubbing your eyes in the morning (this is the hardest part)
Removal. Do it gently or the whole thing stops being worth it
Natural, long lasting results also mean your real lashes stay healthy.
Use the brand’s remover if they have one, or a gentle oil based remover if the system is made for that. If you’re using Pink Purée, follow their specific instructions. Let it sit. Massage slowly. Do not peel clusters off dry. That’s how people lose lashes and then blame the kit.
After removal, wash lashes and give them a break sometimes. Even one or two nights.
Common mistakes that ruin the “natural” look fast
- Using 14 to 16mm lengths right away (it’s usually too much)
- Putting the longest cluster at the very outer corner (it droops)
- Stacking clusters when you’re trying to be natural
- Not matching curl to your natural lashes
- Bonding to skin instead of lash base (itchy, lifts, and not safe)
FAQ: Best DIY Lash Extensions for Natural, Long-Lasting Results with Pink Purée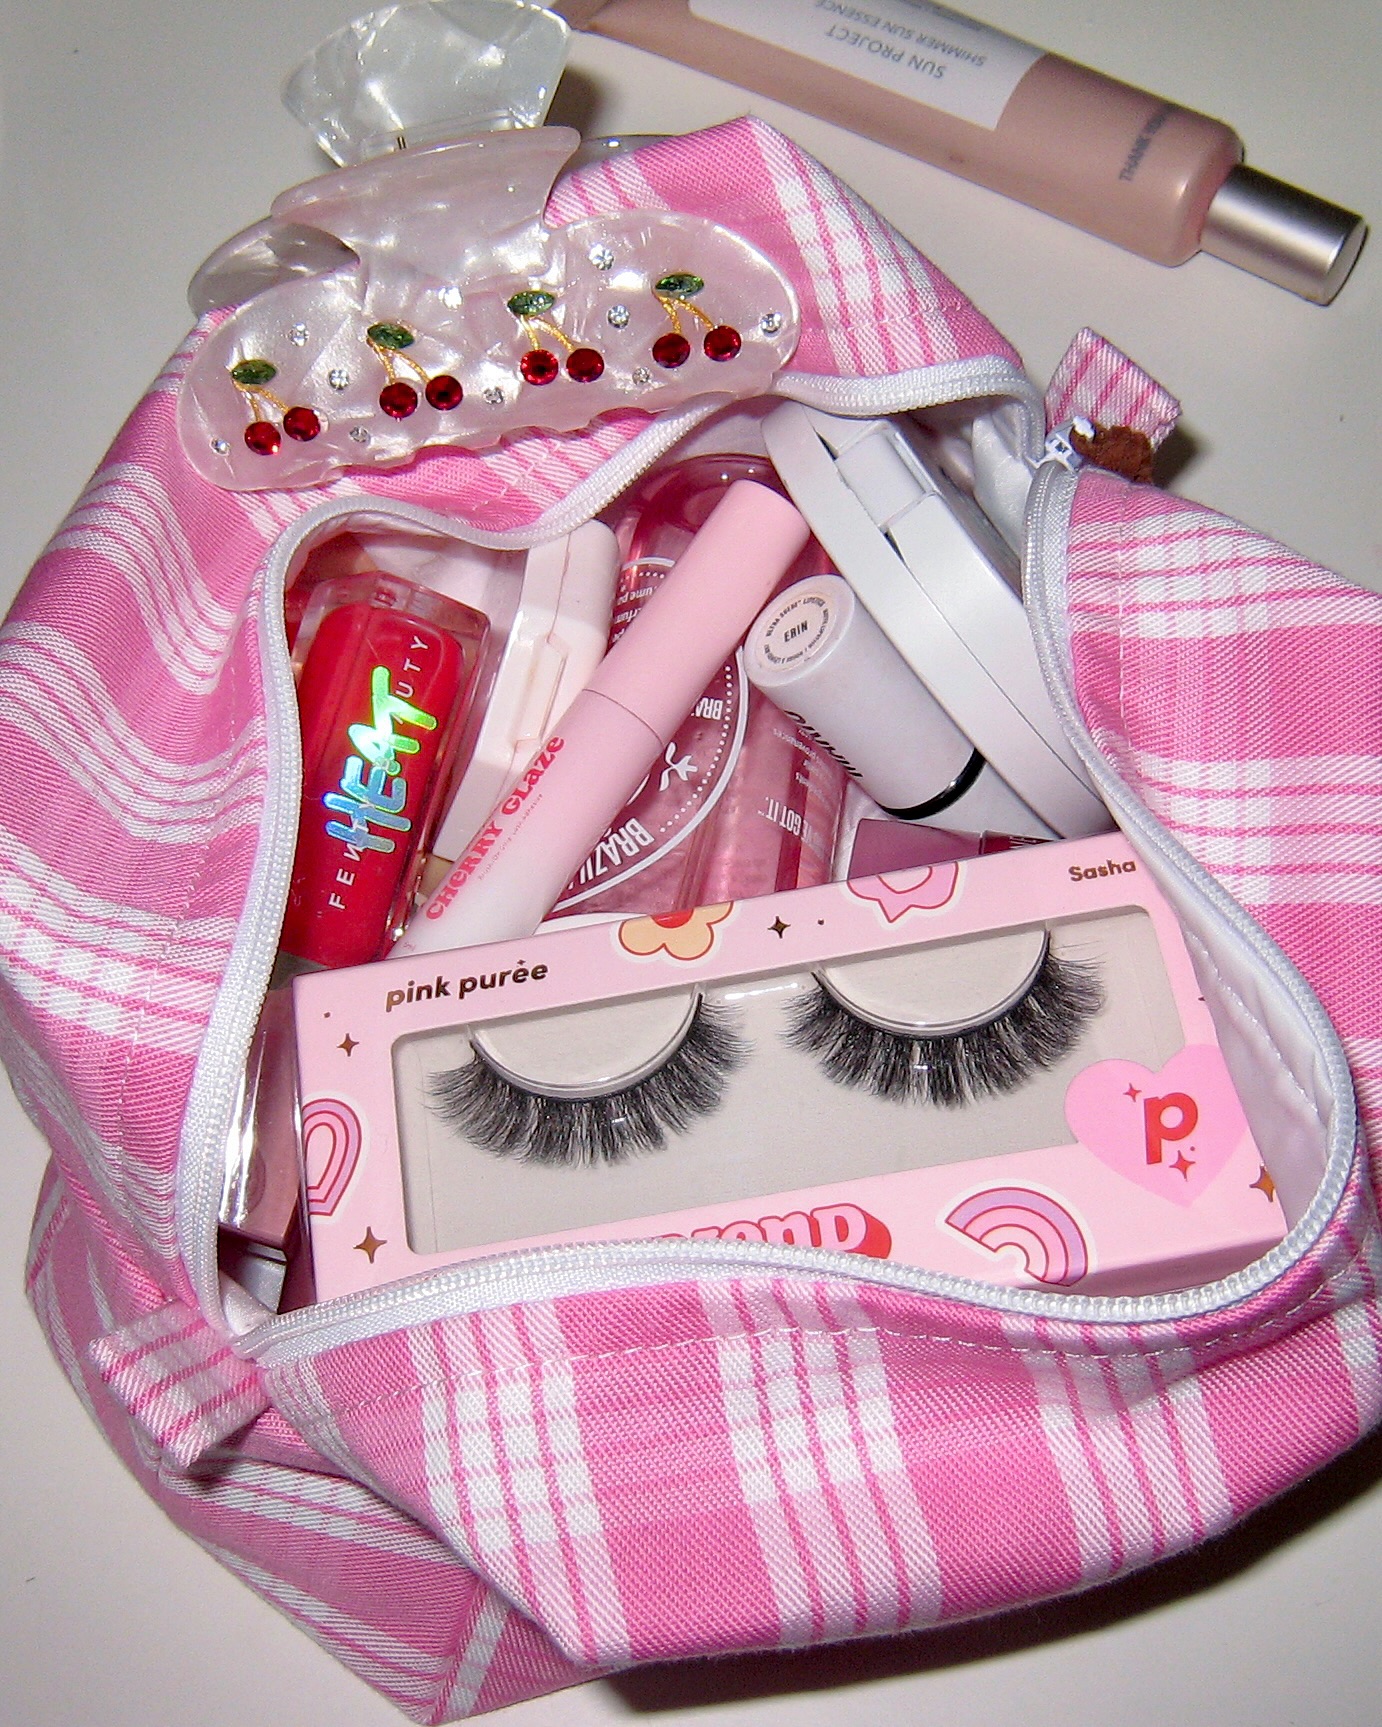
Are DIY lash extensions safe?
DIY cluster lash systems (bond and seal) are generally considered safer than trying to replicate salon individual extensions at home, but there’s still risk. Keep product off the waterline, avoid getting bond in your eye, don’t use salon grade extension glue, and remove gently.
How long do DIY lash extensions last?
Most people get 2 to 5 days with typical bond and seal systems. Some get longer with excellent prep and low oil skin, but if you’re getting a full week, expect more maintenance and be extra careful with cleansing.
What length looks the most natural?
Usually 8mm to 12mm. If you’re going for “are those your real lashes,” stay around 9 to 11mm for most of the eye, with shorter inner corners.
Can I shower with DIY lash extensions?
Yes, but try to avoid heavy steam and direct water pressure for the first 24 hours. After that, be gentle. Pat dry, don’t rub.
Why do my DIY lashes fall off after one day?
Common causes: oily lids, too much bond, not letting bond get tacky, touching lashes a lot, steam too soon, or placing clusters on skin instead of attaching to natural lashes.
Do DIY lash extensions damage your natural lashes?
They can, mainly if you peel them off, wear them too long without proper cleaning, or apply/remove roughly. Gentle removal and giving your lashes breaks helps a lot.
What’s better for natural results, C curl or D curl?
C curl usually looks more natural on most people. D curl can look amazing, but it reads more “done.” If your natural lashes are very straight, D curl can also look separated unless you curl your lashes first. For a complementary look, consider using Pink Purée as part of your beauty routine.
Can I wear mascara with DIY lash extensions?
It’s usually not recommended, especially on the clusters. Mascara can make them clumpy and harder to clean, and it can shorten wear time. If you must, use it lightly on your natural lashes only, but most people skip it.
How do I keep DIY lash extensions from poking?
They’re probably too close to the waterline, or the cluster is angled wrong. Remove that segment and place it slightly higher on the lash base (still underneath), and avoid stiff thick band clusters near the inner and outer corners.
Which DIY lash kit is best for beginners who want natural lashes?
KISS Falscara is a solid beginner option because it’s accessible and forgiving. If you want a more premium, ultra natural finish and don’t mind the cost, Lashify is hard to beat.
Find out more: emmagilt.com
Recommended for you
 Elevate Styles Review: Is This the Most Trusted Place to Buy Wigs Online?
- Elevate Styles Guide: Discover the Stunning Truth About Synthetic vs. Human Hair Wigs
- OcuraLife Review: Is the 6-in-1 Plasma Pen Worth It for At-Home Skin Imperfection Care?
 SISSEL Foam Roller: Welche Härte passt zu dir?
 Honey Acres: The Ultimate Guide to Kosher Certified, Gluten-Free, and Big 9 Allergen-Free Treats
 Kyor OUTGLOW Review: The Effortless Skin Supplement That Actually Transforms Your Glow